
This is my updated experimental installation guide for macOS, December 15, 2021 update. This guide has been tested on Intel and Apple M1 processors, with macOS versions up to Monterey 12.0.1. Please be patient while we work together to make this as easy as possible. If you run into trouble with this, leave a comment. I’ll try, but can’t promise, to address the issues as they arise. If you’re looking for Windows, see My Windows Installation.
My earlier macOS installation is detailed at the bottom of this page. That older version stopped working properly with macOS version 10.15 “Catalina” (due to the end of support for 32 bit applications I think) prompting this update.
The installation package we’ll download here (thanks to Tomio Arisaka) is very general and allows for lots of options. The comprehensive readme files that accompany that download give all needed details. The only complications arise from the extra security restrictions on open-source software in modern macOS versions. The streamlined instructions below are for the specific purpose of installing Maxima for the first time on your Mac and using the graphical user interface wxMaxima. These instructions assume you are able to do some standard macOS things like open a terminal window and move icons between folders.
1. Download and set the security attributes of the Maxima app:
Download this version into your Downloads folder…at this writing the most recent version we’ve successfully installed is 5.43-MacOSX
(there are newer versions, but I don’t have experience with them yet…)
After the download is complete, and before you do anything else, open a Terminal window (how to open Terminal) and copy/paste the line below (followed by enter)
xattr -d com.apple.quarantine $HOME/Downloads/Maxima-5.43.0-VTK-macOS.dmg
If you see a window asking if you want to access a file, select OK
2. Install the Maxima app into your Applications folder
Now go to your Downloads folder and double click on the downloaded file: Maxima-5.43.0-VTK-macOS.dmg. You’ll see this window 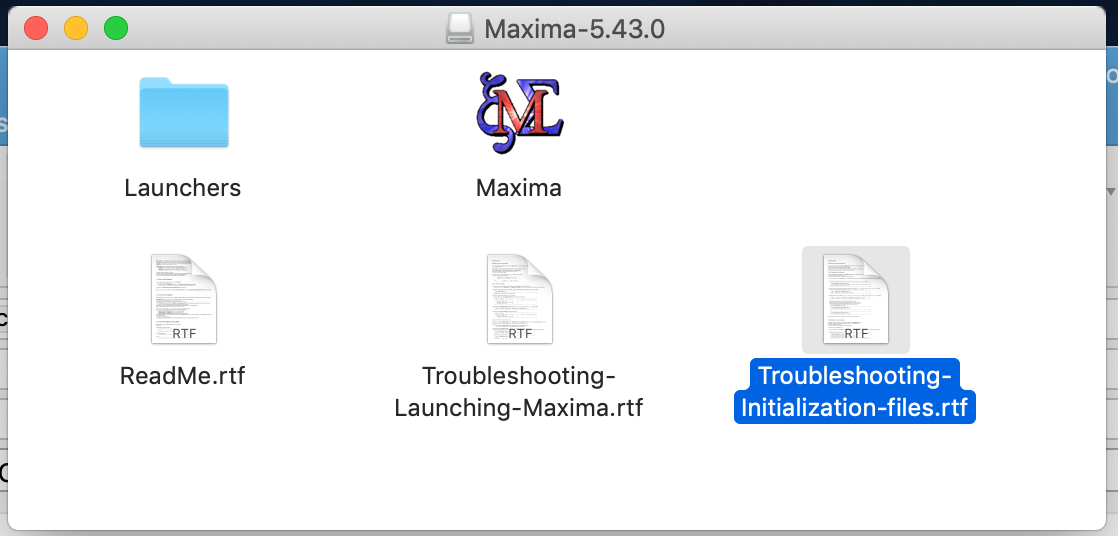
Open your Applications Folder (click in on a blank space of the desktop and hit Shift-CMD-A) and drag the Maxima Icon from Maxima-5.43.0 folder to the Applications Folder, but don’t double click it! Instead, right click (or two finger click, or ctrl click) on the Maxima icon in your Applications Folder and select open from the resulting popup menu. Expect to wait a few minutes this first time—during this time the Maxima icon may bounce weakly(!) in the dock. When you see a window warning you about unknown software, select “open”. You might see a window saying the application can’t be opened. If that happens, go to “System Preferences” and then “Security and Privacy”. In the resulting window, you’ll have the option to run Maxima.
3. Select wxMaxima as your graphical user interface
When you see the Maxima icon bouncing in the dock (extra bouncy!), click it to see a popup window listing several GUI options. Select wxMaxima.
If you then see a window asking about letting wxMaxima access the Terminal, click OK.
If you have an Intel processor in your mac, the result should be a new wxMaxima window. Verify the installation by typing a simple command like 2+2, followed by simultaneous SHIFT ENTER.
If you have an Apple M1 processor, you may be prompted to install Rosetta 2 — an extra application that allows intel-compiled apps to run on the new processor:

Step 3a: Run Maxima from the Applications Folder
You’ll see that a wxMaxima icon has appeared on your dock. ![]() Don’t keep this in the dock! In future sessions, things (especially plots) will only work correctly if you launch the application from the Maxima icon in the Applications folder. If in the future you double click on a saved wxMaxima (.wxmx) file, the resulting instance of wxMaxima won’t handle graphics correctly. If you want something in your dock to make starting the app easier, go to Applications and make an alias to the Maxima app. You can then drag that alias to your dock and double click on it whenever you want to use Maxima in the future.
Don’t keep this in the dock! In future sessions, things (especially plots) will only work correctly if you launch the application from the Maxima icon in the Applications folder. If in the future you double click on a saved wxMaxima (.wxmx) file, the resulting instance of wxMaxima won’t handle graphics correctly. If you want something in your dock to make starting the app easier, go to Applications and make an alias to the Maxima app. You can then drag that alias to your dock and double click on it whenever you want to use Maxima in the future.
4. Verify that Maxima plots are working
Copy the following command line into your wxMaxima window, followed by simultaneous SHIFT ENTER
wxdraw2d(explicit(sin(x),x,-%pi,%pi));
a plot of the sine function should appear in your wxMaxima window. If you see a warning message about fonts, proceed to step 5.
**If you get the error /bin/sh/gnuplot: command not found, go back and re-read step 3a **
**If you get the error Couldn’t execute “/Applications/Gnuplot.app…”**

there is likely an earlier installation of Maxima that is interfering with the new one. To clean that up, open a Terminal window (how to open Terminal) and copy/paste the line below (followed by enter)
rm .maxima/maxima-init.mac
then restart maxima and you should be able to do graphs.
5. Download and Install needed fonts
If wxMaxima warns about missing fonts when you run a graphics command, Download the fonts into your Downloads folder. Double click on the downloaded file TeX-fonts-10. A window will open listing six .ttf font files. For each one, double click on the name and select “Install Font” in the lower right corner of the resulting window.
****Everything below this line works only for macOS versions 10.14 “Mojave” and older. ****
Grab the newest stable version for which the instructions below apply…at this writing that’s 5.38.0-MacOSX.
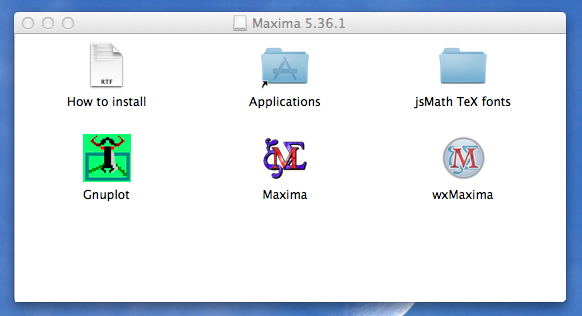
Below is what you see when you open the installer. The first three steps are easy, the fourth requires a bit of patience:
- drag Maxima to the Applications folder
- drag wxMaxima to the Applications folder
- drag Gnuplot to the Applications folder (If you have an old machine with Core 2 duo skip this and see the instructions at the bottom of this post)
- open the jsMath TeX fonts folder, and click on the six font files one at a time. Each time a window will appear, inviting you to click and install that font. Do. That. Each. Time.
Next up, you can navigate to your Applications folder and open wxMaxima. In the wxMaxima window, try a command (try 2+2 SHIFT ENTER). If nothing happens or you get an error message, you’ll need to tell the program where to find your newly installed copy of Maxima.
Go to wxMaxima —> Preferences… —> Maxima, click open, and navigate to the Applications folder and double click on the Maxima icon

At that point, close and re-open wxMaxima and you can execute Maxima commands (try 2+2 SHIFT ENTER).
How to configure plotting:
Plotting probably won’t work correctly right out of the box. Try copying and pasting this onto the wxMaxima command line, followed by SHIFT ENTER:
wxplot2d([sin(x)],[x,0,10]);

If you get an error like the one above, two last things need to be done:
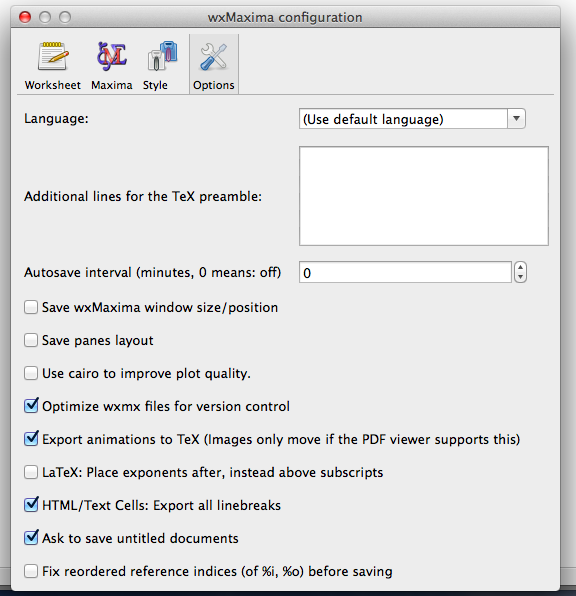
First, go to wxMaxima —> Preferences… —> Options and if “Use cairo to improve plot quality.” is checked, unselect it.
 .
.
Finally, we need to create a configuration file. We need to tell Maxima where to find gnuplot on your computer, and we need to let each of the draw and plot functions know where to open external windows. I’ve made a macOS app called Maximascript makes those things happen*:
Download the configuration app
After downloading the app, macOS will of course prevent you from double clicking and running an unknown app you got from an unknown source, so you’ll need to find Maximascript in Finder—Downloads, double-finger click and select Open, and then agree that you want to open it. The result will be almost underwhelming — a terminal window opens and displays the line “maxima script” to let you know that things happened as planned. You can close that window.
To be sure everything is working go back to wxMaxima and try copying and pasting these four commands, one at a time, in the wxMaxima window to confirm that each flavor of the Maxima plot/draw utility works
wxplot2d(sin(x),[x,0,10]);  /* should  plot in wxMaxima window */
plot2d(sin(x),[x,0,10]);  /* should open a gnuplot window,
                         close this window before proceeding */
wxdraw2d(explicit(sin(x),x,0,10)); /* draw in wxMaxima window */
draw2d(explicit(sin(x),x,0,10)); /*opens a gnuplot window
                                  close this window before proceeding */
If you’re running a Core 2 Duo processor
It appears that there are compiler directives in recent Gnuplot binaries that don’t work on the older processors. In this case, you’ll need to compile your own Gnuplot executable. Here’s an easy-ish way to do that using Homebrew:
- copy, paste and run this long line in a terminal window:
/usr/bin/ruby -e "$(curl -fsSL https://raw.githubusercontent.com/Homebrew/install/master/install)" - When that is done working, make sure that the soon-to-be installation directory is owned by you (you’ll be prompted for your password)
sudo chown -R `whoami` /usr/local - Now install gnuplot with
brew install gnuplot --with-qt5
- change the first line of ~/.maxima/maxima-init.mac to read
gnuplot_command:"/usr/local/bin/gnuplot"$
*What’s happening inside Maximascript:
Maximascript is a shell script that I wrapped up as a clickable macOS app using the free program Platypus. It creates a new directory called .maxima in the home directory, and creates a file called maxima-init.mac The app adds these three lines to the init file:
gnuplot_command:"/Applications/Gnuplot.app/Contents/Resources/bin/gnuplot"$
set_plot_options([gnuplot_term, qt])$
set_draw_defaults(terminal=qt)$
If you’re a veteran terminal shell user, just create the directory .maxima in the home directory with mkdir, open maxima-init.mac in an editor, and paste in those 3 lines.
